Facebook Badge


Merchant Hall here I come!
I had the whole day just for looking at and playing with new products, meeting with and making new contacts and viewing all those demos.
After having spent my time the previous day connecting with companies we currently deal with, I spent a lot of time establishing connections with lots of new companies which you will see start to appear on our website in the very near future.
There were dozens of demos but my favorite demo was the Brush Embroidery Stencil:

This technique looks so effective. The trick is to add a little piping gel to your royal icing. This helps it stay wet longer so you have time to work with your design. Dip your brush into some water, dab off the excess then gently pull through the icing. Clean your brush off after every few strokes and repeat till finished. Leave to harden as normal.
This was so amazing to watch. There were 3 teams of 3 people competing in a 5 hour cake decorating challenge. The theme this year was "Exploring Nevada". The rules were simple - the entire base design could be made from Styrofoam but must be able to be reproduced in cake and everything else like decorations must be edible.
We were allowed to come and go throughout the day. It was great to see how much progress they had made each time and where their designs were going. In the end there were 3 phenomenal cakes and 9 very exhausted Decorators.
First Place:
Second Place:
Third Place: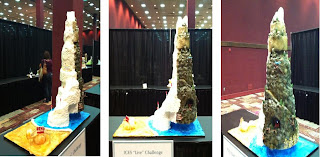
In between watching the Cake Challange I spent my time in the Merchant Hall. I met with many of our current suppliers. It was great putting faces to names and talking to them about all their popular products as well as many of the new ones.
So many cakes! Ranging from cookies to plaques to single-tier cakes to multi-tier cakes and even a few cake sculptures. The talent of some people is beyond the imagination sometimes. I think by the end of the day I had been around 3 or 4 times just to make sure I had seen everything.


So many great cakes and great ideas to help inspire anyone.
Later that afternoon we were treated to early entry into the Merchant Hall - so many well known brands and a few new ones all under one roof.
There were 80 stalls in all featuring all manner of decorating tools and decorations. Talk about feeling like a kid in a candy store!
I love cutters. Any shape cutter. I also like to be able to use a cutter in more ways than one. Sometimes I look at a cutter and say "how else can I use that?" So when I saw this class, I just had to attend.
Mark took us through a couple of cutters from the JEM cutter line - the Double Square Cutter and the Heart Scroll Cutter.
- First up was the Double Square Cutter from the Hollow Side Cutters Set.
The Double Square on its own looks good going around the side of a cake or wrapped over the edges. In this demonstration, Mark showed us that when you cut the image out you are left with the inside squares. He used them in the side design to help add interest to the border. You could also dry these inside squares and use them in a later project for accents or small plaques.

- From the same Hollow Side Cutters set Mark also used the Heart Scroll Cutter.
When you cut multiple hearts and join them in a row, you end up with a lovely double heart border. Again, there is the secondary shape created - the inside of the heart creates a small heart that can be used to help accent cake board corners or the cake itself. Or, as before, it can be left to harden to use at a later time. For example, a single cut of the Heart Scroll can be left to harden and used as a cupcake topper.

Next, Mark showed us how to use the Bubble Frieze Cutter and the Side Scroll cutter. He demonstrated these on a Celebration Cake.
- The Bubble Frieze Cutter
Using the Bubble Frieze cutter, Mark used the bubbles in their length wrapping over the edge of the cake. Again, this cutter gives you the extras of all the circles from inside the bubbles. You could use them to add accent or dry as before. This would also be a good cutter to use just for the many circles it can produce of different sizes.
- The Side Scroll Cutter
As you can see, the scrolls can be easily cut to form two scrolls for easy cake board accents.


We are always looking for new and exciting ways to dress up our cakes. What could be more amazing than adding a little bling?
Rhinestone Mesh was used in the cake below but, really, any sparkly trim you can find at the local craft/sewing store would work I'm sure.
Geraldine used royal icing to attach the bling to the gum paste/fondant. If you are worried about having a non food grade item on your cake or want to give your cake a little bit more stability, you can cut lengths of acetate to the length and width you need. Again, royal icing will hold this to your trim. Or, if you want, a hot glue gun can be used - just don't add to anything that is going to be eaten.
Rhinestone Mesh is also quite handy if you are wanting to make letters.
First bend floral wire into the shape you want leaving a length sticking out the bottom to act as the spike for sticking into your cake or cupcake. Cut a single strand length of the Rhinestone Mesh and, using a hot glue gun, attach it to the wire shape you created. Once dry, it is ready to add to your cake/cupcake.

I am a Crafter from way back and like to try most things. I have to admit I have not tried modelling fondant as yet as it always looked too complicated and overwhelming. However, watching Kelly sculpt this scarecrow in front of us and revealing some of her secrets for cutting down the work was inspiring and energizing. I am all for making things quicker and easier. Who knows, I may just try a few of these tricks.
I think the best ideas were with the sheaf of corn stalks and the scarecrow shown below...
Instead of moulding the sheaf of corn stalks with gum paste she used rice cereal treats (you could also use cake). The main advantage to this is that it takes a lot of the weight out of the project and helps prevent the cake sagging.
When it came to the scarecrow, instead of rolling large balls of gum paste for the body, head and pumpkin, Kelly used gumballs for the centres and wrapped a thin layer of gum paste over them. Again this helps with weight and the drying time, so she can keep creating.

- Decorating with Rolled Buttercream with Marsha Winbeckler
- Fun Fall Friends in Gum Paste with Kelly Lance
- Bling Present with Geraldine Randlesome
- Creative Side Designs Using Gutters with Mark Seaman
Decorating with Rolled Buttercream with Marsha Winbeckler
Rolled buttercream is an alternative to rolled fondant. You can Google many recipes for rolled buttercream. It needs to be made in a sturdy stand mixer. It can be refrigerated for a couple of weeks or frozen for several months. Let the icing come to room temperature before using.
To cover a cake, first crumb coat. This layer needs to stay moist for the rolled buttercream to adhere. If it does start to crust, spritz with a little water. You need it tacky to adhere layers together. While working with the rolled buttercream you will have about 20 - 30 mins to apply and add detail before it starts to harden. Once finished, cover the cake as you would for a fondant covered cake.
You can thicken (harden) with CMC powder to help when making models or decorations. To attach heavy items use piping gel. To attach lighter items you can use water.
You can pipe with rolled buttercream. You will need to thin down with water to get a stretchy paste consistency that can be piped.


I started my day with a visit to the Registration Desk. The place was filled with the buzz of excitement and anticipation of what was to come in the following day. Here they were very welcoming and happy to spend the time to talk to you and go over everything in your Packet, from I.D. tag to Special Events invites and the all important Goodie Bag. Included in the Packet was a program of events, rules, maps and schedule.
Demo: How to make a Fondant Crown

The Venue
The Convention was held in the Grand Sierra Resort & Casino, which has a very colourful history. It had it's beginnings back in 1978. Built by Metro Goldwyn Mayer of movie fame it is modelled after the MGM Grand in Las Vegas. Since then it has had several different owners and undergone numerous renovations and extensions.

The Convention


 Our cake girl has just finished her day at the US ices conference. After 4 fun days we have loads of pictures and stories from the conference. Starting with this one the conference cake.
FREE DELIVERY WEEKEND STARTS NOW! ends November 20th 2011 12pm so be quick!
http://www.thecakeshop.co.nz/


 Apart from making fabulous cakes Emma also does a great range of lessons. I wanted to share this with you as we get asked so many times about where to go for good lessons.
The best of all is there are weekend classes and also night ones so those of you who work during the week like me do not have to miss out.
The courses are limited to 6-8 people so that everyone can get the maximum benefit and have plenty of fun at the same time! Each lesson includes a combination of professional demonstrations and hands-on practise and you can enjoy full use of all our equipment for the duration of the lesson.
So if want to learn more about this wonderful art from a very talented lady click here to check out the wonderful lessons she is running at the moment at Strawberry Sky.
Each year at our house we make chocolates with added homemade hokeypokey or marshmallow and they always go down an absolute treat with the recipients. But this year I thought I would add some coloured ones to the mix so was very pleased when I saw the Easter Candy Making Kit from Wilton come in so I grabbed one for myself. My children eye it up every day, it's going to be a long wait till Easter! The kit includes everything you need with 3 different moulds full of fun designs, candy melts, lollipop sticks, decorating brush and party bags great value at $25.50.
 For those of you who would like to make coloured chocolates in your own favourite Easter mould. We now also stock the Wilton Candy Melts Chocolate range in Red, Pink, Orange,Yellow,Blue, Light Cocoa, White, Green. $8.50 14oz (397gram bag)


And if you need something to box all those goodies in we have just the things from bags to boxes. I have put my favourite below Hop & Tweet Boxes these can be used for your Easter cupcakes, cookies and chocolate valued at $13.50.
 So check out our Easter range there is no end to the amazing things you can create this Easter.
We also have a great special deal for our blog and facebook members. Order 3 Easter items in an order placed between now and Wednesday 30th March and receive a free mystery Easter chocolate mould with your order! To receive your free gift simply write Blog or Facebook Fan - Easter promotion in the comments box in the checkout!


Happy new year everyone! I hope you had a great break. It always seems to go so fast! We are excited to be back again though and have some absolutely fabulous things happening this year with many additions coming up to our product range and a very exciting function on our website which we will be revelling next month.
There's still lots of time to get your cake decorating goodies before Christmas! and we have added a CHERRY ON THE TOP for your Christmas Shopping at http://www.thecakeshop.co.nz/ .FREE DELIVERY ! Finishes Tuesday December 21st 2010 Midnight!
Conditions apply - can not be used in conjunction with the REGALICE OR VOUCHER GRAB OFFER.
YOU MUST click the Cherry on the top free delivery option on the checkout form when placing your order.
We know you need your orders in a hurry. So the elves at the cake shop are working overtime! All orders placed and payment received by 1pm are shipping same day!
Click here to view our latest Newsletter!
The gorgeous cupcake sets below have just arrived in from the very creative people at Meri Meri and I am very excited these are top quality and cover some wonderful themes, each kit contains 24 papers in two designs and 24 picks in 4 designs. Such an easy way to decorate you party cupcakes!
We have also added the pink and blue Meri Meri cases and cupcake boxes - sooooooo cute! perfect to put that very special cupcake in for some one as a gift. Click here to see the full range!
A cupcake decoration kit for a fairy lover with four individual fairy character toppers and two beautifully patterned cupcake case designs. Priced at $27.50. Click here to view.

A cupcake decoration kit for all your pirate mates, with two pirate themed cupcake papers and pirate picks to match. Priced at $27.50. Click here to view.

A cupcake kit for a ballet party. With floral decorated cake cases and an assortment of dancers as cake toppers embellished with a sheer ribbon. Priced at $27.50. Click here to view.

A cupcake set for a fast moving party. This speedy set comes with chequered flag cases and race car cases and a choice of car cake toppers to match your favorite colours. Priced at $27.50. Click here to view.

These beautifully patterned cupcake cases match our striped cupcake box, but can be used separately to enhance your table. Priced at $7.00 packet of 48 cases.Click here to view. A fabulous pattern adorns this delightful cupcake box. The perfect way to present your creations. The beautiful package is finished with a satin bow. This small cake box contains a tray for a single cupcake. Priced at 13.50 for 4 boxes and 4 tags. Click here to view.
Check out this new Renshaw marzipan it is produced from the finest specially selected almonds and manufactured on roller refiners to give unique texture, taste and moulding properties. The flavour is derived from bitter almonds and no artificial flavours are used. All renshaw marzipans contain at least 23.5% dry almond content. Size of packet 500grams. Priced at $15.50. Click here for details.

